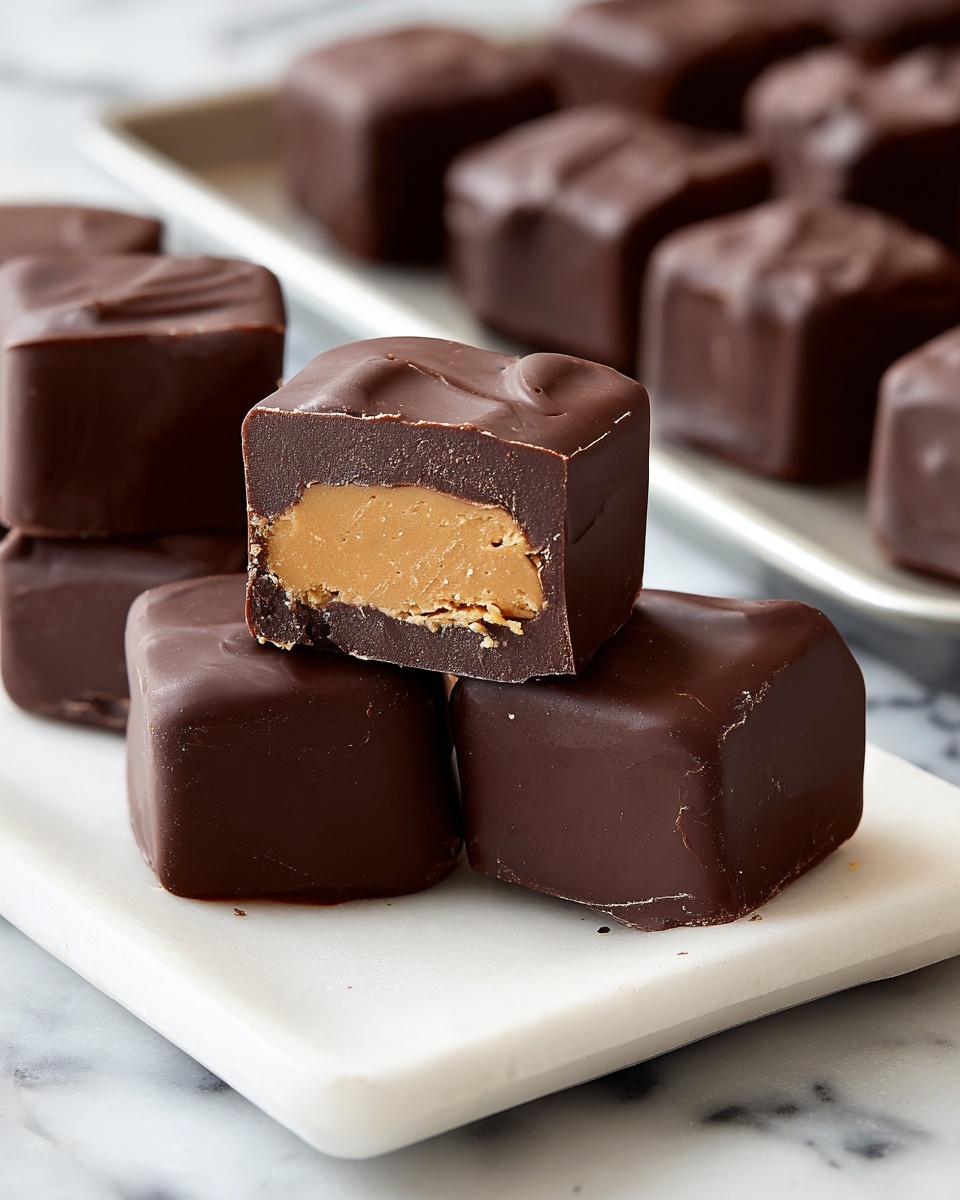
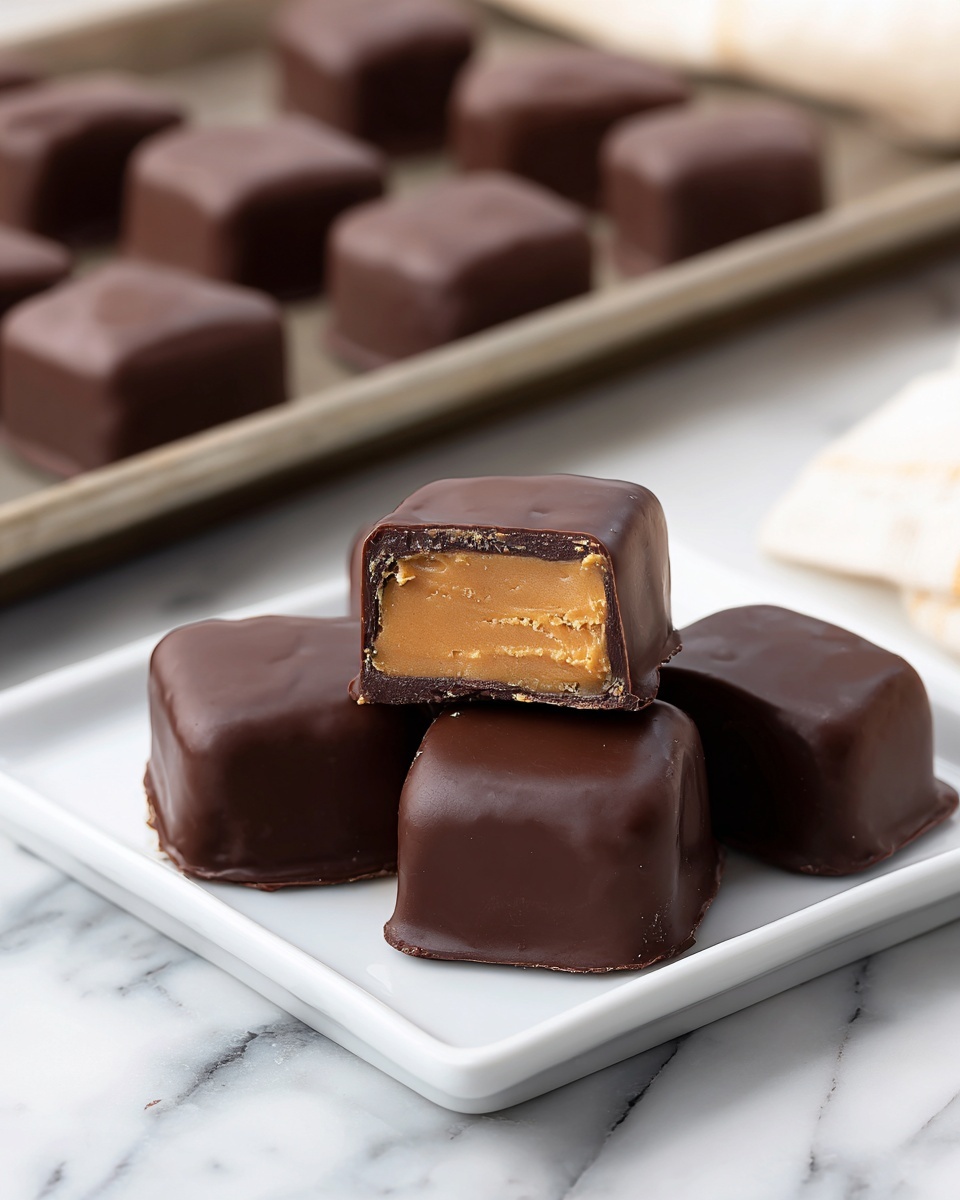
If you have a sweet tooth and love the magical pairing of rich chocolate and creamy peanut butter, this Chocolate Peanut Butter Candies Recipe is about to become your new obsession. These little bites of happiness combine smooth peanut butter with a luscious chocolate coating, creating a recipe that’s delightfully simple to make but incredibly satisfying to enjoy. Whether you’re treating yourself or sharing with friends, these candies offer that perfect balance of textures and flavors that just can’t be beat.

Ingredients You’ll Need
Starting with a handful of everyday pantry items, this recipe shines by using simple but essential ingredients. Each one plays a crucial role — from the creamy peanut butter that forms the base, to the powdered sugar that sweetens and firms it up, to the chocolate that brings everything together with a glossy finish.
- 1 cup creamy peanut butter: For that irresistible nutty flavor and creamy texture that’s the heart of the candies.
- 1/4 cup unsalted butter, softened: Adds richness and helps the mixture hold together smoothly.
- 1 1/2 cups powdered sugar: Sweetens the filling and gives it just the right firmness for shaping.
- 1 teaspoon vanilla extract: Elevates the overall flavor with a warm, aromatic touch.
- 2 cups semi-sweet chocolate chips: Or dark chocolate if you prefer a more intense, decadent coating.
- 1 tablespoon coconut oil or shortening (optional): Helps achieve a shiny, smooth chocolate coating that sets perfectly.
How to Make Chocolate Peanut Butter Candies Recipe
Step 1: Prepare the Peanut Butter Mixture
Start by combining the creamy peanut butter, softened butter, powdered sugar, and vanilla extract in a medium mixing bowl. Stir them together until the mixture is fully smooth and well combined. This blend will form the luscious, sweet center of your candies, so make sure there are no lumps and it’s perfectly creamy before moving on.
Step 2: Shape the Candies
Once your peanut butter mixture is ready, roll it into small, bite-sized balls. Placing these on a parchment-lined baking sheet helps prevent sticking and keeps things tidy. Then pop the tray into the freezer for about 15 to 20 minutes. Chilling solidifies the centers, making them easier to dip into chocolate later.
Step 3: Melt the Chocolate
While the peanut butter balls firm up, melt your chocolate chips along with the optional coconut oil in a microwave-safe bowl. Heat in 20-second bursts, stirring each time to ensure the chocolate melts evenly without burning. The coconut oil is a little secret that smooths out the chocolate for a gorgeous, glossy finish on your candies.
Step 4: Dip the Peanut Butter Balls
Here’s where the candies really start to come together. Using a fork, dip each chilled peanut butter ball into the melted chocolate, making sure it’s fully coated. Gently tap off any excess chocolate before placing it back onto the parchment-lined sheet. This dipping step transforms the simple peanut butter centers into decadent treats.
Step 5: Set the Chocolate Coating
After all your candies are dipped, refrigerate them for another 15 to 20 minutes. This cooling period allows the chocolate to harden beautifully, giving your candies a satisfying snap when you bite into them. Once set, your Chocolate Peanut Butter Candies Recipe is ready to enjoy or share!
How to Serve Chocolate Peanut Butter Candies Recipe
Garnishes
To add a little extra flair, sprinkle some finely chopped peanuts or a pinch of sea salt on top of the fresh chocolate coating before it sets. Not only do these garnishes provide a lovely contrast in texture, but they also enhance the rich peanut and chocolate flavors.
Side Dishes
These candies pair wonderfully with a warm cup of coffee or a creamy glass of milk. If you’re serving a dessert platter, consider fresh berries or a few crunchy pretzels alongside to balance out the sweetness with some fresh and salty notes.
Creative Ways to Present
For a festive touch, arrange your Chocolate Peanut Butter Candies Recipe in mini paper cupcake liners or drizzle a little white chocolate over them in delicate stripes. Wrapping them individually in colorful foil also makes for charming homemade gifts. Presentation can make these treats look as special as they taste!
Make Ahead and Storage
Storing Leftovers
Keep any leftover candies stored in an airtight container in the refrigerator. They maintain their freshness and texture well for up to two weeks, making it easy to satisfy your sweet cravings anytime without starting from scratch.
Freezing
If you want to keep these candies longer, freezing is a great option. Place them in a single layer on a baking sheet to freeze individually, then transfer to a sealed freezer bag or container. They’ll keep for up to three months and thaw quickly at room temperature.
Reheating
Because these candies are best enjoyed cool to keep their shape, reheating isn’t necessary. However, if the chocolate becomes too firm, letting them sit at room temperature for a few minutes softens the chocolate nicely without any mess.
FAQs
Can I use crunchy peanut butter instead of creamy?
You certainly can! Using crunchy peanut butter will add a delightful texture to the filling, giving your candies a little crunch in each bite.
Is there a substitute for powdered sugar?
Powdered sugar is best for the smooth texture it creates, but if needed, you can process granulated sugar until fine or use a sugar substitute designed for baking. Just keep in mind it may slightly alter the texture.
What if I don’t have coconut oil for the chocolate?
It’s totally optional, so you can skip it if you want. The chocolate might be a bit thicker and less glossy, but it will still taste amazing!
How do I prevent the chocolate from cracking once set?
Adding the coconut oil helps with that, and keeping the candies refrigerated until serving keeps the chocolate firm but flexible. Avoid sudden temperature changes to maintain a smooth coating.
Can I make these candies vegan?
By using dairy-free chocolate chips, vegan butter, and ensuring the peanut butter is free from additives, you can enjoy a delicious vegan version of this recipe.
Final Thoughts
This Chocolate Peanut Butter Candies Recipe is a pure joy to make and even more enjoyable to eat. It’s simple, customizable, and perfect for gifting or snacking at home. Once you try this recipe, you’ll find it hard to resist making it again and again — so go ahead, treat yourself and share the love!
Print
Chocolate Peanut Butter Candies Recipe
- Prep Time: 10 minutes
- Cook Time: 0 minutes
- Total Time: 40 minutes
- Yield: 24 servings
- Category: Dessert
- Method: No-Cook
- Cuisine: American
Description
Delightfully rich and creamy Chocolate Peanut Butter Candies, perfect for satisfying your sweet tooth with a smooth peanut butter center coated in decadent semi-sweet chocolate. These bite-sized treats are easy to make, require no baking, and set quickly in the freezer and refrigerator, making them a perfect homemade candy for any occasion.
Ingredients
Peanut Butter Mixture
- 1 cup creamy peanut butter
- 1/4 cup unsalted butter, softened
- 1 1/2 cups powdered sugar
- 1 teaspoon vanilla extract
Chocolate Coating
- 2 cups semi-sweet chocolate chips (or dark chocolate for a richer flavor)
- 1 tablespoon coconut oil or shortening (optional, for smoother chocolate coating)
Instructions
- Prepare the Peanut Butter Mixture: In a medium mixing bowl, combine the creamy peanut butter, softened unsalted butter, powdered sugar, and vanilla extract. Stir thoroughly until the mixture is smooth and fully incorporated with no lumps.
- Form the Candy Balls: Roll the peanut butter mixture into small, bite-sized balls. Place the formed balls on a baking sheet lined with parchment paper. Then chill them in the freezer for 15 to 20 minutes until they are firm and easy to handle.
- Melt the Chocolate: While the peanut butter balls chill, place the semi-sweet chocolate chips and coconut oil (if using) in a microwave-safe bowl. Heat in 20-second intervals, stirring well between each, until the chocolate is completely melted and smooth.
- Dip the Peanut Butter Balls: Using a fork, dip each chilled peanut butter ball into the melted chocolate, making sure it is fully coated. Gently tap the fork on the side of the bowl to remove any excess chocolate. Transfer the chocolate-coated candies back onto the parchment-lined baking sheet.
- Set the Candies: Once all candy balls are dipped, place the baking sheet in the refrigerator. Let them chill for 15 to 20 minutes or until the chocolate coating is completely set and firm.
Notes
- Use dark chocolate instead of semi-sweet chocolate for a richer and slightly less sweet flavor.
- The optional coconut oil or shortening helps achieve a smoother chocolate coating and a shiny finish.
- These candies should be kept refrigerated to maintain their firmness and prevent melting.
- For a nut-free option, substitute peanut butter with sunflower seed butter.
- Store leftovers in an airtight container in the refrigerator for up to two weeks.

