
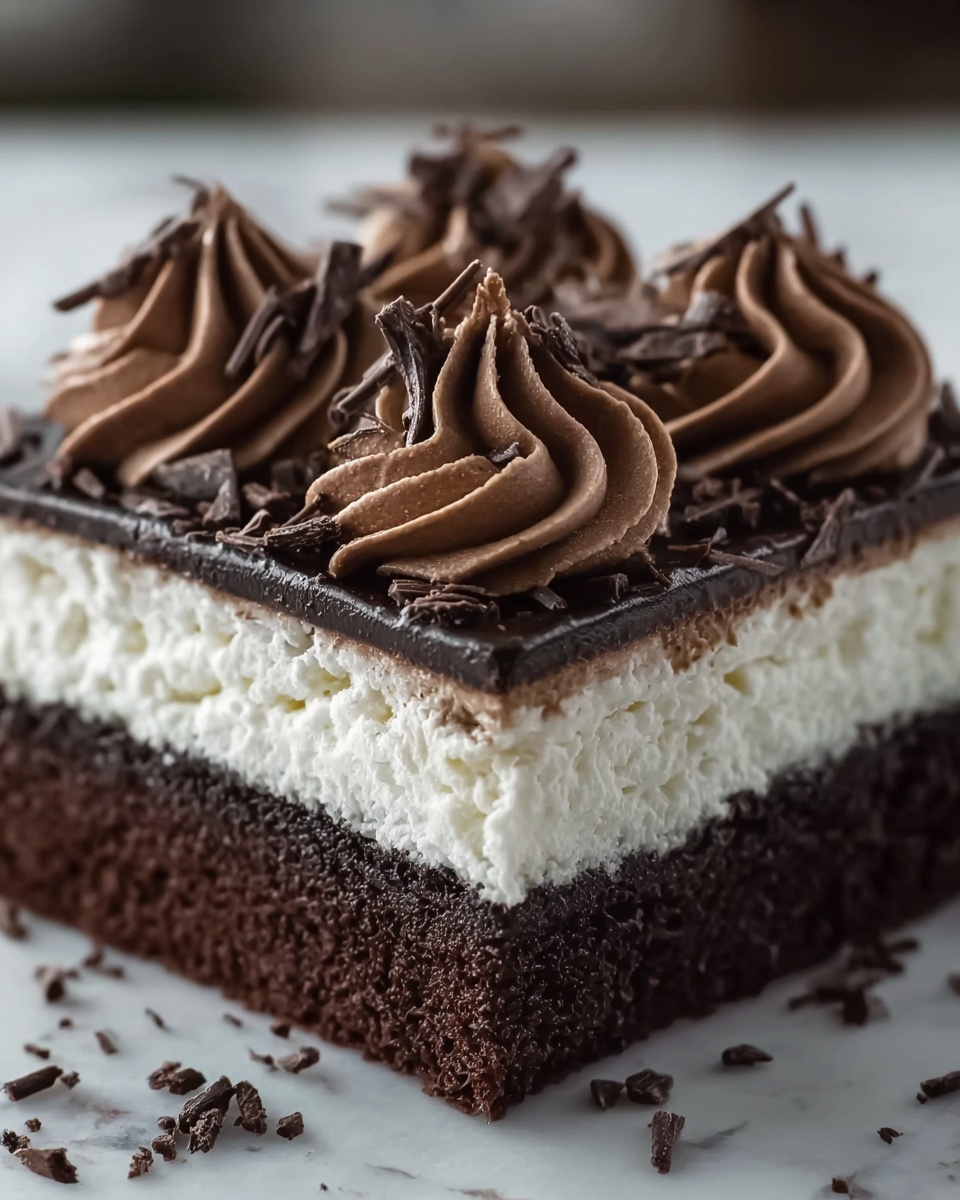
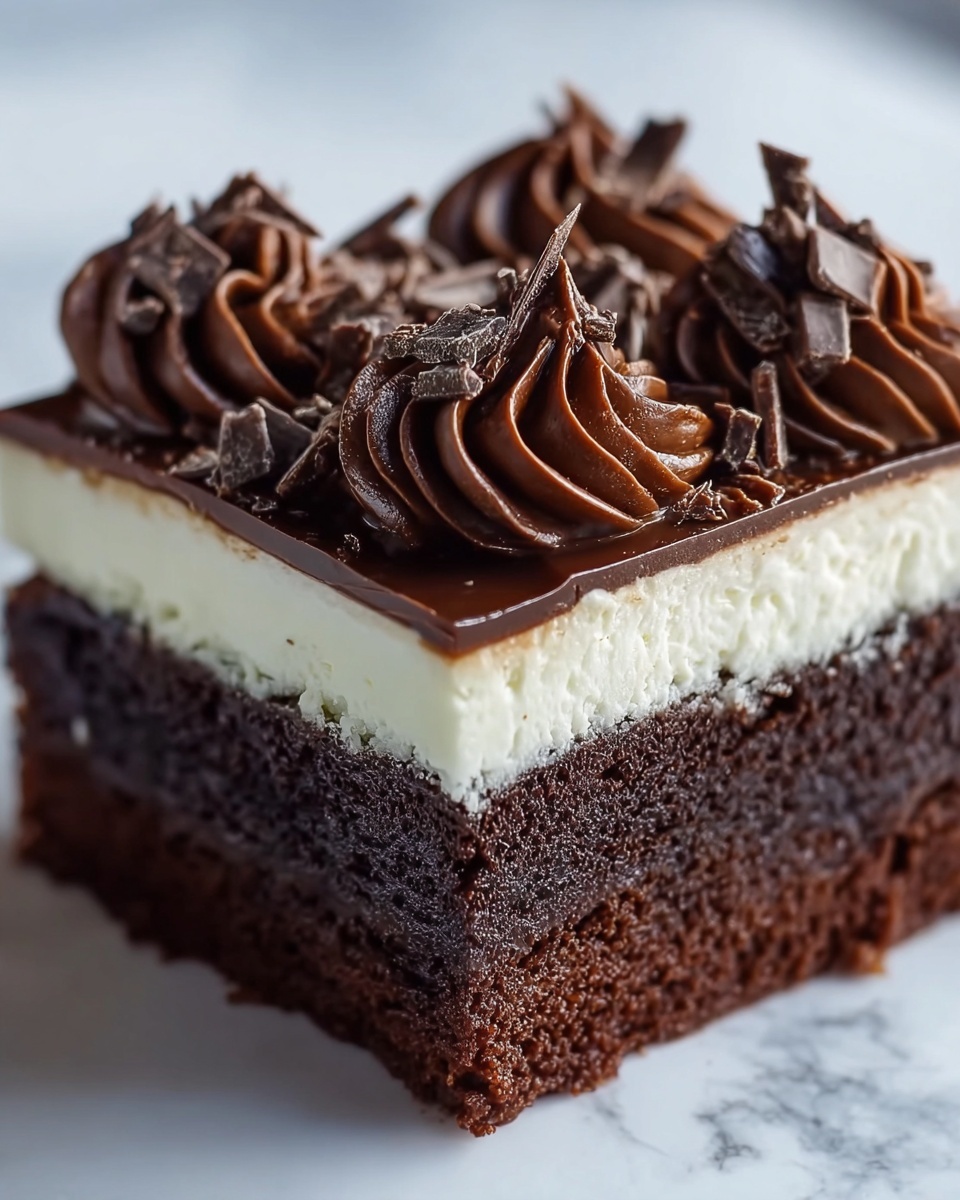
If you are on the hunt for a dessert that combines rich, fudgy brownies with silky layers of creamy filling, look no further than this Brownie Refrigerator Cake Recipe. This no-bake delight is all about layering textures and deep chocolate flavor, chilled to perfection for a dessert that cuts like a dream and melts in your mouth. It’s the ultimate showstopper for any occasion, yet simple enough to whip up any day when a sweet craving strikes.
Ingredients You’ll Need
These simple ingredients are the backbone of the Brownie Refrigerator Cake Recipe. Each contributes its special touch—from the dense, chocolaty brownie base to the light and fluffy cream cheese filling, and the glossy chocolate topping that brings it all together.
- Brownie mix (or homemade brownies): Provides a rich and fudgy base that’s moist and dense.
- Chocolate chips: Optional for extra bursts of melty chocolate goodness in and on top of the dessert.
- Cream cheese: Adds a tangy creaminess that balances the chocolate perfectly.
- Powdered sugar: Sweetens the cream cheese mixture smoothly without any graininess.
- Vanilla extract: Enhances the flavor profile with warm, comforting notes.
- Heavy whipping cream: Whipped to fluffy peaks, it lightens up the filling and adds luxurious texture.
- Cocoa powder: Optional, but a great addition for boosting the chocolate flavor in the creamy layer.
- Heavy cream (for melting chocolate): Helps create a smooth, glossy finish for the decadent chocolate topping.
How to Make Brownie Refrigerator Cake Recipe
Step 1: Prepare the Brownie Base
Begin by baking the brownies following the package instructions or your personal recipe. For that extra chocolate heaven, stir in half a cup of chocolate chips before baking. Once baked, allow the brownies to cool completely—this step is crucial to prevent the creamy layers from melting later. Then cut them into small squares or your preferred size; these squares will be the foundation of your refrigerator cake.
Step 2: Make the Creamy Filling
In a large mixing bowl, beat the softened cream cheese until it becomes smooth and creamy. Add in powdered sugar and vanilla extract, whipping the mixture until fully blended and silky. In a separate bowl chilled beforehand, whip the heavy cream until stiff peaks form to create that fluffy texture. Gently fold the whipped cream into the cream cheese base, being careful not to deflate the lightness. If you’re a chocolate lover, mix in the cocoa powder to make the filling extra decadent.
Step 3: Assemble the Cake
Grab a 9-by-13-inch dish and start layering. Lay half of your brownie pieces evenly on the bottom, forming a sturdy base. Spread half of the creamy filling over this brownie layer with a spatula, smoothing it out to the edges. Repeat this layering process, ending with the creamy filling on top.
Step 4: Prepare the Chocolate Topping
In a small saucepan over low heat, melt your chocolate chips together with two tablespoons of heavy cream, stirring continuously until you achieve a perfectly smooth and glossy ganache. Let it cool slightly so it’s still pourable but won’t soak into the layers, then drizzle it lovingly over the top of your cake, creating an elegant chocolate drizzle that seals in all the flavors.
Step 5: Chill to Perfection
Place your masterpiece in the refrigerator for at least four hours or ideally overnight. This chill time allows the layers to set firmly, making slicing neat and easy while letting the flavors meld beautifully.
Step 6: Serve and Enjoy
Once your Brownie Refrigerator Cake Recipe has fully chilled, cut it into generous squares and watch faces light up with every bite. The combination of textured layers and rich chocolatey flavors is utterly irresistible.
How to Serve Brownie Refrigerator Cake Recipe
Garnishes
Consider topping your slices with fresh berries like raspberries or strawberries for a pop of color and a fresh, slightly tart contrast. A sprinkle of crushed nuts or a dusting of powdered sugar adds a delightful crunch or a delicate finish. Whipped cream dollops can also amplify the creaminess just before serving.
Side Dishes
This cake pairs wonderfully with a scoop of vanilla or coffee-flavored ice cream to complement the rich chocolate layers. For an adult gathering, a small glass of dessert wine or a robust cup of coffee rounds out the indulgence perfectly.
Creative Ways to Present
Try serving the Brownie Refrigerator Cake Recipe in individual trifle cups by layering brownie pieces, cream filling, and ganache for a stunning presentation. You can also cut the cake into small squares and arrange them on a platter with edible flowers or cocoa dusting. Any presentation adds to the irresistible charm of this dessert.
Make Ahead and Storage
Storing Leftovers
Leftover cake should be covered tightly with plastic wrap or stored in an airtight container to prevent it from drying out or absorbing fridge odors. It will keep wonderfully for up to four days, allowing you to enjoy this decadent treat a little longer.
Freezing
While the texture may change slightly, you can freeze the Brownie Refrigerator Cake Recipe for up to one month. Wrap individual slices in plastic wrap and then foil before freezing. Thaw in the refrigerator overnight before serving for best results.
Reheating
This dessert is best enjoyed chilled and is not designed for reheating. However, if you prefer a softer texture, let it sit at room temperature for about 15 minutes before serving to let the layers soften just slightly without melting.
FAQs
Can I use homemade brownies for this recipe?
Absolutely! Homemade brownies work beautifully and allow you to customize the flavor and texture. Just ensure they’re fully cooled before assembling the cake.
Is it necessary to add cocoa powder in the filling?
No, the cocoa powder is optional. It adds a richer chocolate dimension to the filling, but the cake is delicious without it if you prefer a lighter cream cheese flavor.
How long should I chill the cake before serving?
Chilling for at least four hours is essential, but overnight is ideal. This gives the cake time to set firm and develop a harmonious flavor.
Can I double this recipe for a bigger crowd?
Yes! Just use a larger dish and increase the layering proportionally. You might need extra chilling time with larger or thicker cakes.
What’s the best way to cut the cake cleanly?
Use a sharp knife warmed in hot water and wiped dry between slices; this helps achieve neat, clean cuts without dragging through the layers.
Final Thoughts
This Brownie Refrigerator Cake Recipe is truly a dessert lover’s dream come true. Its simplicity in preparation combined with its luxurious layers make it one of those recipes you’ll find yourself coming back to again and again. Whether for a special occasion or a sweet everyday treat, it’s sure to win hearts and satisfy chocolate cravings wonderfully. Give it a try and share the joy!
Print
Brownie Refrigerator Cake Recipe
- Prep Time: 20 minutes
- Cook Time: 30 minutes
- Total Time: 4 hours 50 minutes
- Yield: 12 servings
- Category: Dessert
- Method: No-Cook
- Cuisine: American
Description
This Brownie Refrigerator Cake is a luscious, no-bake layered dessert featuring a rich brownie base topped with a creamy, fluffy cream cheese and whipped cream filling, finished with a smooth chocolate ganache drizzle. Perfect for chocolate lovers, it combines the fudgy texture of brownies with a light, airy filling and a chocolate topping, chilled to perfection for an indulgent treat that’s easy to assemble.
Ingredients
Brownie Base
- 1 box brownie mix (prepared according to package directions, including eggs, oil, and water)
- 1/2 cup chocolate chips (optional, for added chocolatey goodness)
Creamy Filling
- 8 oz cream cheese, softened
- 1 cup powdered sugar
- 1 teaspoon vanilla extract
- 2 cups heavy whipping cream, chilled
- 1 tablespoon cocoa powder (optional, for a chocolatey twist)
Chocolate Topping
- 1/2 cup chocolate chips
- 2 tablespoons heavy cream
Instructions
- Prepare the Brownie Base: Bake the brownies following the package or homemade recipe instructions. If desired, mix in 1/2 cup of chocolate chips before baking to boost the chocolate flavor. Allow the brownies to cool completely, then cut them into small squares or your preferred size.
- Make the Creamy Filling: In a large bowl, beat the softened cream cheese until smooth. Add powdered sugar and vanilla extract and continue beating until fully blended. In a separate chilled bowl, whip the heavy cream to stiff peaks. Gently fold the whipped cream into the cream cheese mixture, incorporating cocoa powder if using for a chocolate flavor.
- Assemble the Cake: In a 9×13-inch dish, arrange half of the brownie squares evenly as the base layer. Spread half of the creamy filling over the brownies, smoothing it out with a spatula. Repeat with the remaining brownies and filling to create a second layer.
- Prepare the Chocolate Topping: In a small saucepan, melt the chocolate chips with heavy cream over low heat, stirring until smooth. Let the mixture cool slightly, then drizzle over the top of the cake evenly.
- Chill the Cake: Refrigerate the assembled cake for at least 4 hours or overnight. This chilling process allows the layers to set firmly for easier slicing and serving.
- Serve: Once chilled and set, cut the cake into squares and serve this decadent, creamy brownie dessert.
Notes
- For extra fudgy brownies, use homemade brownie batter instead of a boxed mix.
- The cocoa powder in the filling is optional but enhances the chocolate flavor.
- Use chilled heavy cream and a chilled bowl to ensure the cream whips properly.
- The chocolate topping can be substituted with ganache made from equal parts chocolate and cream for a richer finish.
- Store leftovers covered in the refrigerator for up to 3 days for best freshness.


