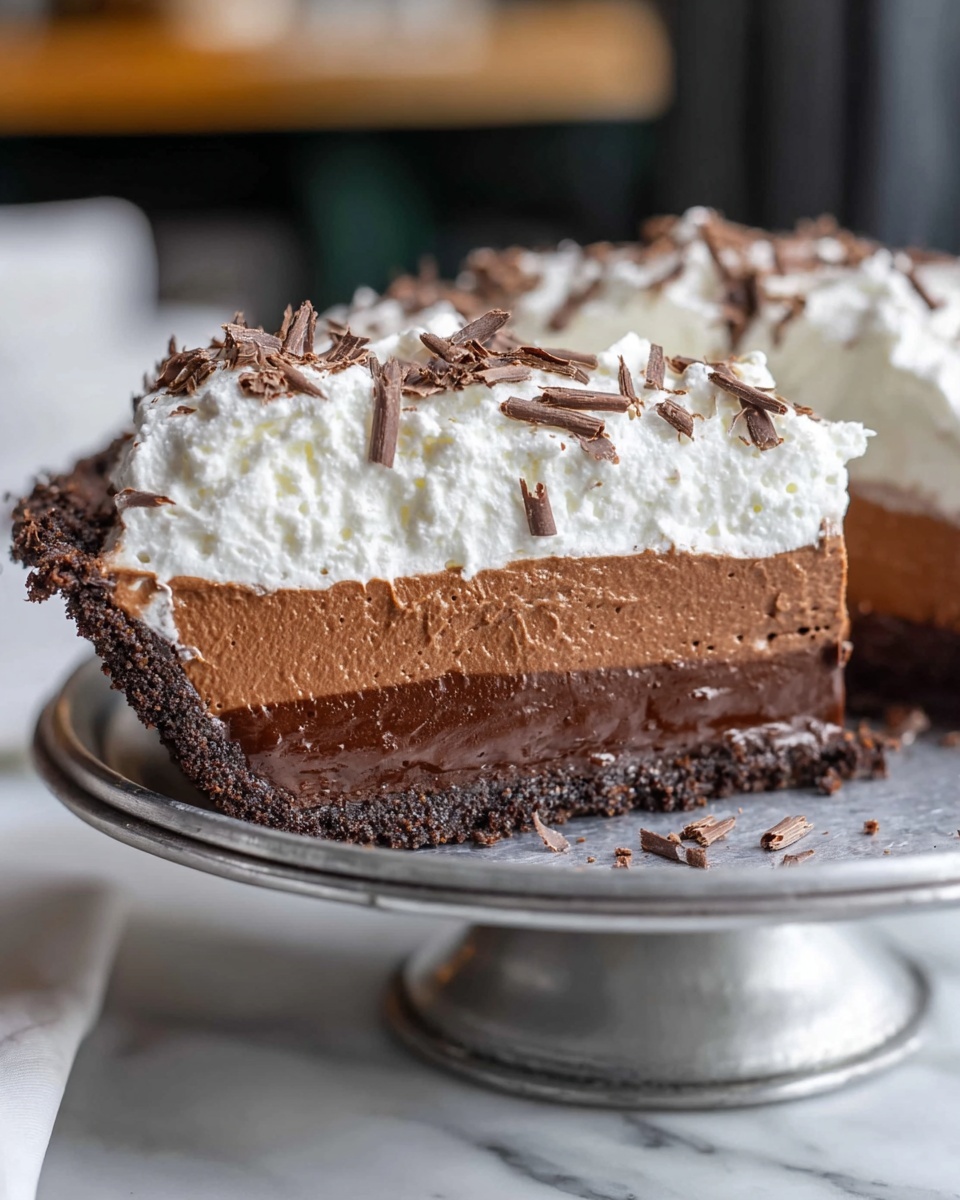
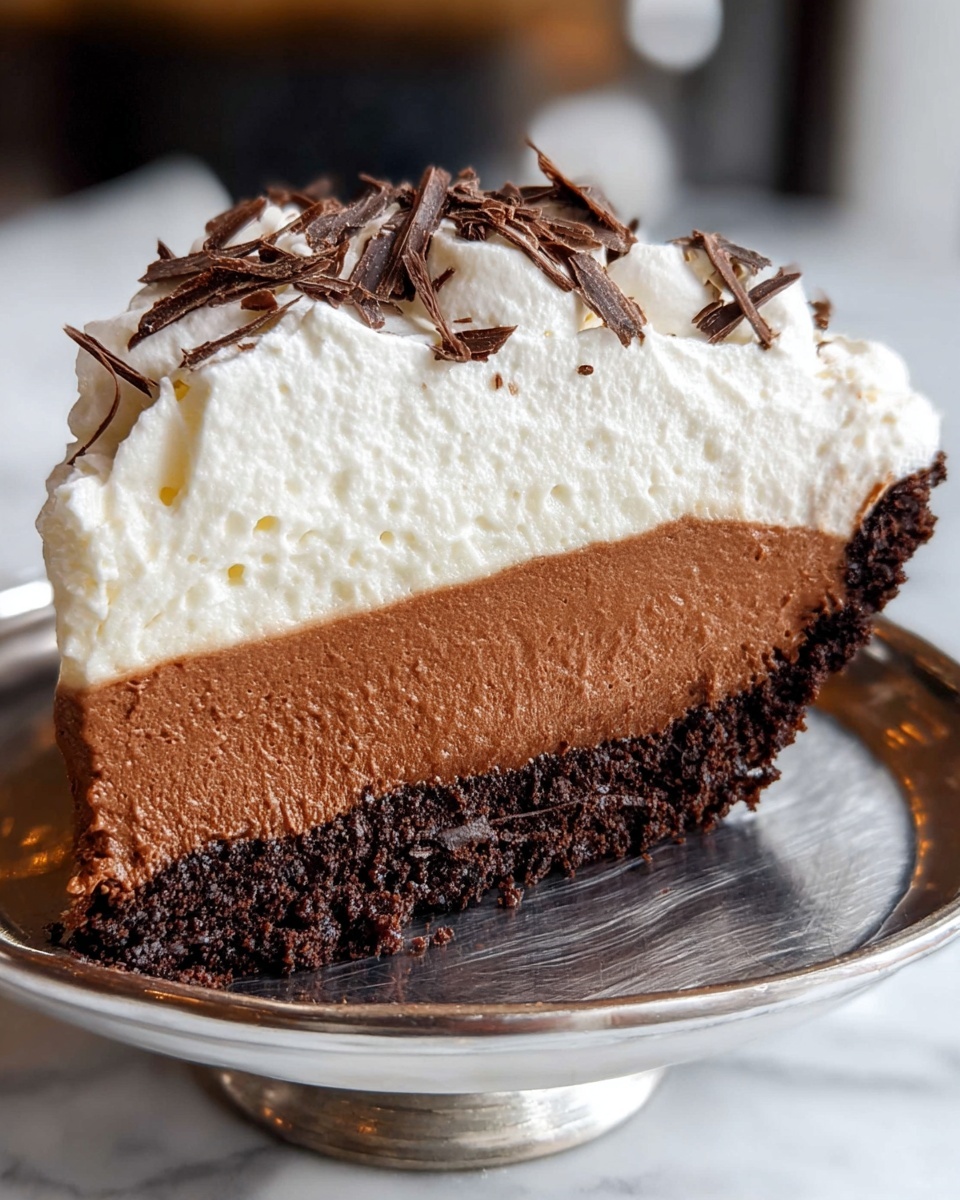
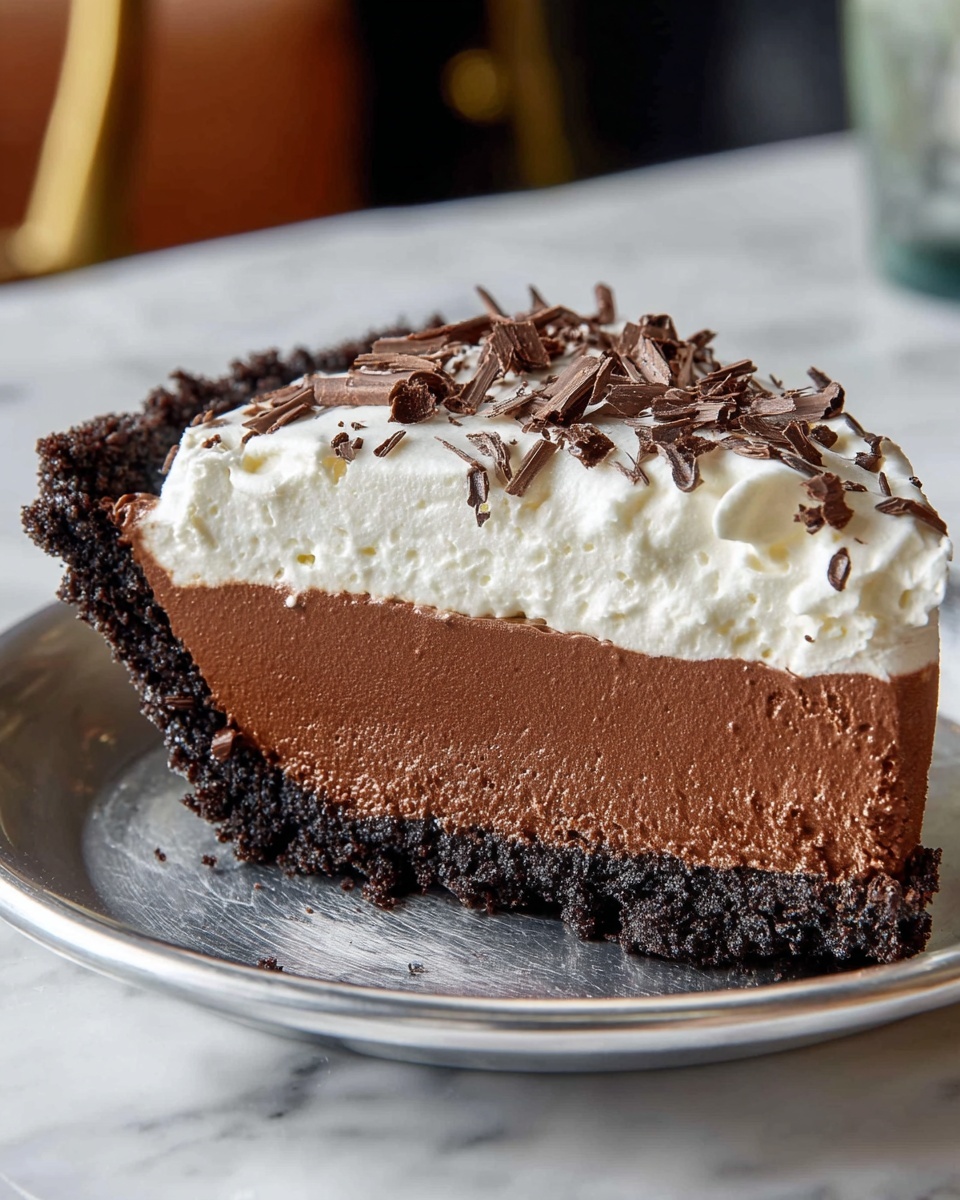
If you are looking for a dessert that effortlessly blends creamy richness with a satisfying crunch, then the Chocolate Mousse Pie with Oreo Crust and Chocolate Shavings Recipe is your new best friend in the kitchen. This indulgent treat combines the decadence of fluffy chocolate mousse with the irresistible crunch of a classic Oreo crust, all topped with delicate chocolate shavings that add a beautiful finish. It’s the perfect crowd-pleaser for any occasion, offering a luscious texture and deep chocolate flavor that will have everyone coming back for seconds.
Ingredients You’ll Need
Gathering the right ingredients is the key to mastering this delightful dessert. Each component plays an important role in balancing flavor, texture, and presentation, turning simple basics into an extraordinary pie.
- Salted butter, 2 Tbsp diced: Adds richness and helps melt the chocolate smoothly.
- Semi-sweet chocolate chips, 1 cup: Provides the primary chocolate base that’s smooth and sweet.
- Bittersweet chocolate chips, 1/2 cup: Adds depth and a slight tang to balance the sweetness.
- Mini marshmallows, 2 cups: Melts into the chocolate mixture, lending a velvety texture.
- Whole milk, 1/3 cup: Creates a creamy consistency in the chocolate base.
- Vanilla extract, 1 tsp: Enhances the chocolate flavor with a warm, aromatic note.
- Heavy whipping cream, 1 3/4 cups + 1 cup: Used both in folding into the mousse and whipping for topping to ensure lightness and fluffiness.
- Oreo pie crust, 1 crust: The crunchy and chocolatey foundation that gives the pie a satisfying bite.
- Granulated sugar, 2 Tbsp: Sweetens the whipped cream topping for a perfect balance.
- Chocolate shavings, for garnish: Adds a decorative and flavorful finishing touch.
How to Make Chocolate Mousse Pie with Oreo Crust and Chocolate Shavings Recipe
Step 1: Create the Decadent Chocolate Mixture
Start by gently heating the salted butter, whole milk, semi-sweet and bittersweet chocolate chips, along with mini marshmallows in a large saucepan over low heat. Stirring continuously is essential here to melt everything evenly and avoid burning. Once the marshmallows are melted completely and the chocolate mixture turns wonderfully smooth and creamy, take it off the heat. Stir in the vanilla extract to infuse aroma and flavor. Let it cool at room temperature for about an hour, so it’s ready to be combined with the whipped cream without melting it.
Step 2: Whip the Heavy Cream to Stiff Peaks
Pour 1 3/4 cups of heavy whipping cream into a large bowl and use an electric mixer to whip it until stiff peaks form. This means when you lift the mixer, the cream holds sharp peaks without falling over. It’s crucial not to overwhip – you want a luscious, airy texture that will lighten the chocolate base in the next step.
Step 3: Fold Whipped Cream into Chocolate Mixture
Gently fold the whipped cream into your cooled chocolate base using a spatula. Take your time with this to keep as much air in the mixture as possible, resulting in that signature light and fluffy chocolate mousse texture. The color should become uniform, signaling a perfect blend without losing the mousse’s airy quality.
Step 4: Pour the Mousse into the Oreo Crust
Now for the fun part: spoon your fluffy chocolate mousse into the Oreo pie crust. Use your spatula to spread it evenly from edge to edge, ensuring every bite will have that perfect layer of mousse sitting on the crisp Oreo’s chocolatey foundation.
Step 5: Refrigerate Until Set
Pop the pie into the refrigerator and chill it for at least 3 hours. This waiting period might test your patience but is vital for the mousse to firm up and achieve that melt-in-your-mouth consistency.
Step 6: Prepare the Sweetened Whipped Cream Topping
While the pie is chilling, combine 1 cup of heavy cream with 2 tablespoons of granulated sugar in a clean bowl. Whip until stiff peaks form, making sure it’s smooth and holds shape beautifully. This topping will add sweetness and a creamy contrast to the rich chocolate mousse.
Step 7: Decorate and Finish
Once chilled, spread the sweetened whipped cream evenly over the mousse layer. Generously garnish with chocolate shavings to add a touch of elegance and extra chocolate flavor. For best results, keep the pie refrigerated until ready to serve, slicing carefully to maintain clean edges.
How to Serve Chocolate Mousse Pie with Oreo Crust and Chocolate Shavings Recipe
Garnishes
While chocolate shavings are classic, you can elevate your presentation by adding fresh raspberries or a sprinkle of cocoa powder. Tiny mint leaves can add a subtle freshness that contrasts beautifully with the rich chocolate flavors.
Side Dishes
This pie stands strong on its own but pairs beautifully with a scoop of vanilla bean ice cream or a drizzle of raspberry coulis for a burst of complementary flavor. Fresh fruit slices also provide a tangy balance that cuts through the richness.
Creative Ways to Present
Serving the pie in individual clear glasses or ramekins creates an elegant, modern look perfect for dinner parties. You can also try layering mousse between additional crushed Oreos for a fun twist, making each bite a delightful surprise of textures.
Make Ahead and Storage
Storing Leftovers
Keep any leftover pie covered with plastic wrap or in an airtight container in the refrigerator. It will maintain its freshness and texture for up to 3 days. Avoid leaving it out at room temperature for extended periods to preserve the mousse’s delicate consistency.
Freezing
If you want to enjoy this pie later, it freezes well. Wrap the pie tightly with plastic and then foil to prevent freezer burn. Thaw overnight in the refrigerator before serving to restore its creamy texture perfectly.
Reheating
This dessert is best enjoyed cold, so reheating is not recommended. Instead, let the pie thaw gently to maintain its mousse-like texture, which is the star of this dish.
FAQs
Can I use a different type of cookie crust?
Absolutely! While the Oreo crust adds a perfect chocolate crunch, you can substitute with graham cracker or chocolate wafer crusts to customize the flavor profile.
How do I prevent the mousse from deflating?
Folding the whipped cream gently and avoiding overmixing is key. This helps keep the mousse light and airy with a beautiful fluffy texture.
Can I make this pie dairy-free?
Yes, by using dairy-free chocolate, coconut cream as a substitute for heavy cream, and a suitable dairy-free crust, you can create a vegan-friendly version that’s just as delicious.
Why is it important to chill the pie for 3 hours?
This chilling time allows the mousse to firm up so it holds its shape when sliced, giving you that perfect creamy yet stable pie consistency.
How far in advance can I prepare this pie?
You can make the pie a day ahead, which actually enhances the flavor and texture as the mousse sets fully. Just be sure to keep it well covered in the refrigerator.
Final Thoughts
There’s something wonderfully satisfying about creating a dessert that feels both luxurious and effortless, and this Chocolate Mousse Pie with Oreo Crust and Chocolate Shavings Recipe hits that mark perfectly. Whether you’re celebrating a special occasion or simply craving a luscious chocolate treat, this pie promises a memorable experience from the first bite to the last. So go ahead, whip up this delightful pie and watch it become a beloved tradition in your home too!
Print
Chocolate Mousse Pie with Oreo Crust and Chocolate Shavings Recipe
- Prep Time: 5 minutes
- Cook Time: 10 minutes
- Total Time: 3 hours 15 minutes
- Yield: 10 slices
- Category: Dessert
- Method: Stovetop
- Cuisine: American
Description
This decadent Chocolate Mousse Pie features a luscious blend of melted chocolate, marshmallows, and whipped cream, all nestled in a crunchy Oreo pie crust. The airy mousse texture combined with the rich chocolate flavors makes it a perfect dessert for special occasions or indulgent treats.
Ingredients
Chocolate Mixture
- 2 Tbsp salted butter, diced
- 1 cup semi-sweet chocolate chips
- 1/2 cup bittersweet chocolate chips
- 2 cups mini marshmallows
- 1/3 cup whole milk
- 1 tsp vanilla extract
Mousse
- 1 3/4 cups heavy whipping cream
Crust
- 1 Oreo pie crust
Topping
- 1 cup (235ml) heavy cream
- 2 Tbsp (25g) granulated sugar
- Chocolate shavings, for garnish
Instructions
- Make Chocolate Mixture: In a large saucepan over low heat, combine the butter, whole milk, semi-sweet and bittersweet chocolate chips, and mini marshmallows. Stir continuously until the marshmallows are completely melted and the mixture is smooth and creamy. Remove from heat and stir in vanilla extract. Allow the mixture to cool at room temperature for 1 hour.
- Whip Cream for Mousse: In a large mixing bowl, whip 1 3/4 cups heavy whipping cream using an electric mixer until stiff peaks form. Be careful not to overwhip to maintain the right texture.
- Combine Whipped Cream and Chocolate: Gently fold the whipped cream into the cooled chocolate mixture using a spatula. Mix until the mousse is light, fluffy, and uniform in color, avoiding overmixing to preserve the airy texture.
- Fill Pie Crust: Pour the chocolate mousse into the Oreo pie crust and spread evenly with a spatula.
- Chill Mousse: Refrigerate the pie for at least 3 hours to allow the mousse to set firmly.
- Prepare Whipped Cream Topping: In a clean bowl, combine 1 cup heavy cream and granulated sugar. Whip until stiff peaks form, ensuring the topping is smooth and holds its shape.
- Garnish and Serve: Spread the sweetened whipped cream over the chilled mousse pie. Garnish liberally with chocolate shavings. Keep refrigerated until ready to serve. Slice before serving.
Notes
- Allow the chocolate mixture to cool completely before folding in whipped cream to prevent melting the cream.
- Do not overwhip the cream to avoid it turning grainy or buttery.
- Use a spatula to gently fold ingredients together to retain the mousse’s airy texture.
- If you don’t have an Oreo pie crust, you may substitute with a graham cracker crust or homemade chocolate cookie crust.
- Chill the pie for at least 3 hours; longer chilling will help the mousse to set even firmer.
- For extra flavor, you can add a tablespoon of coffee or espresso to the chocolate mixture to enhance the chocolate taste.


