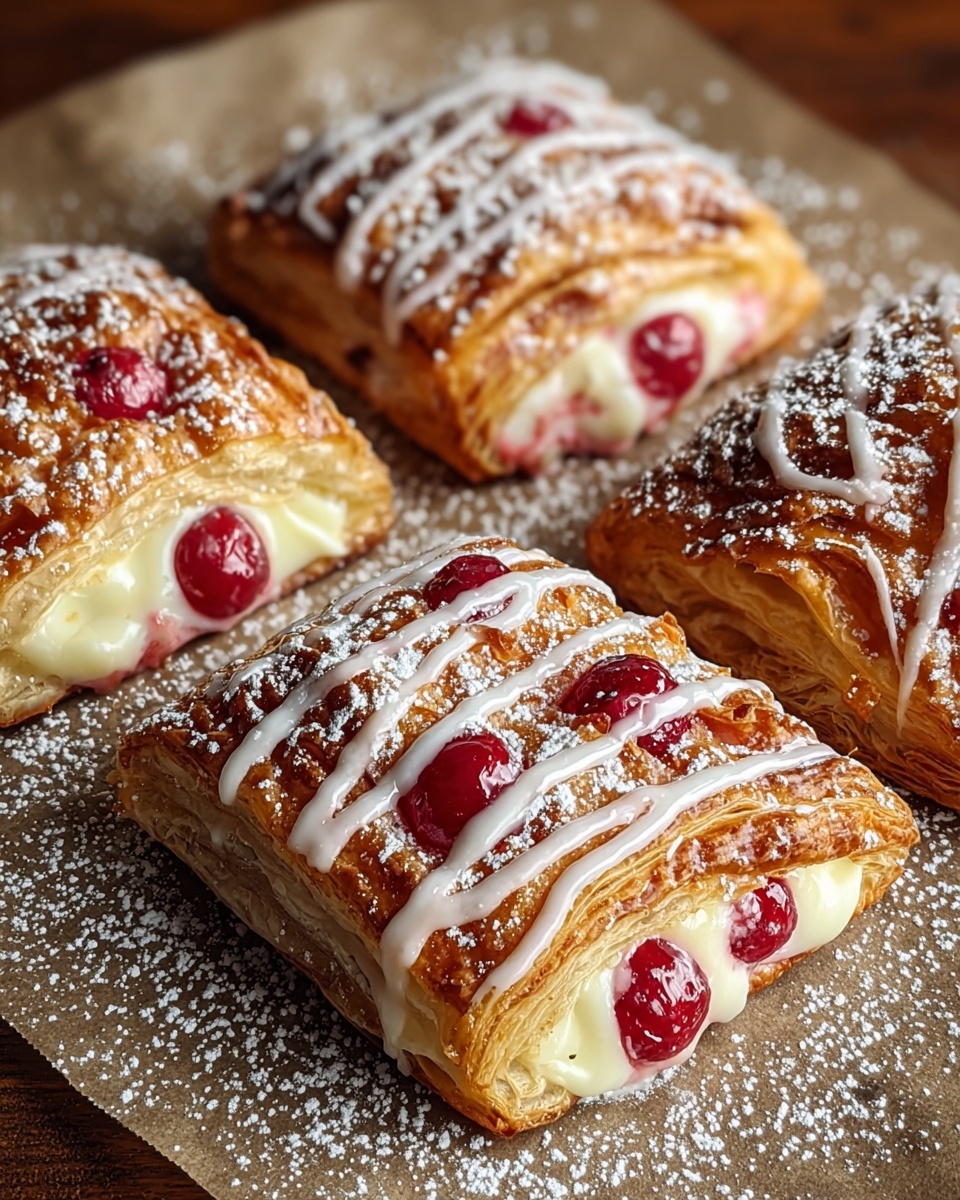
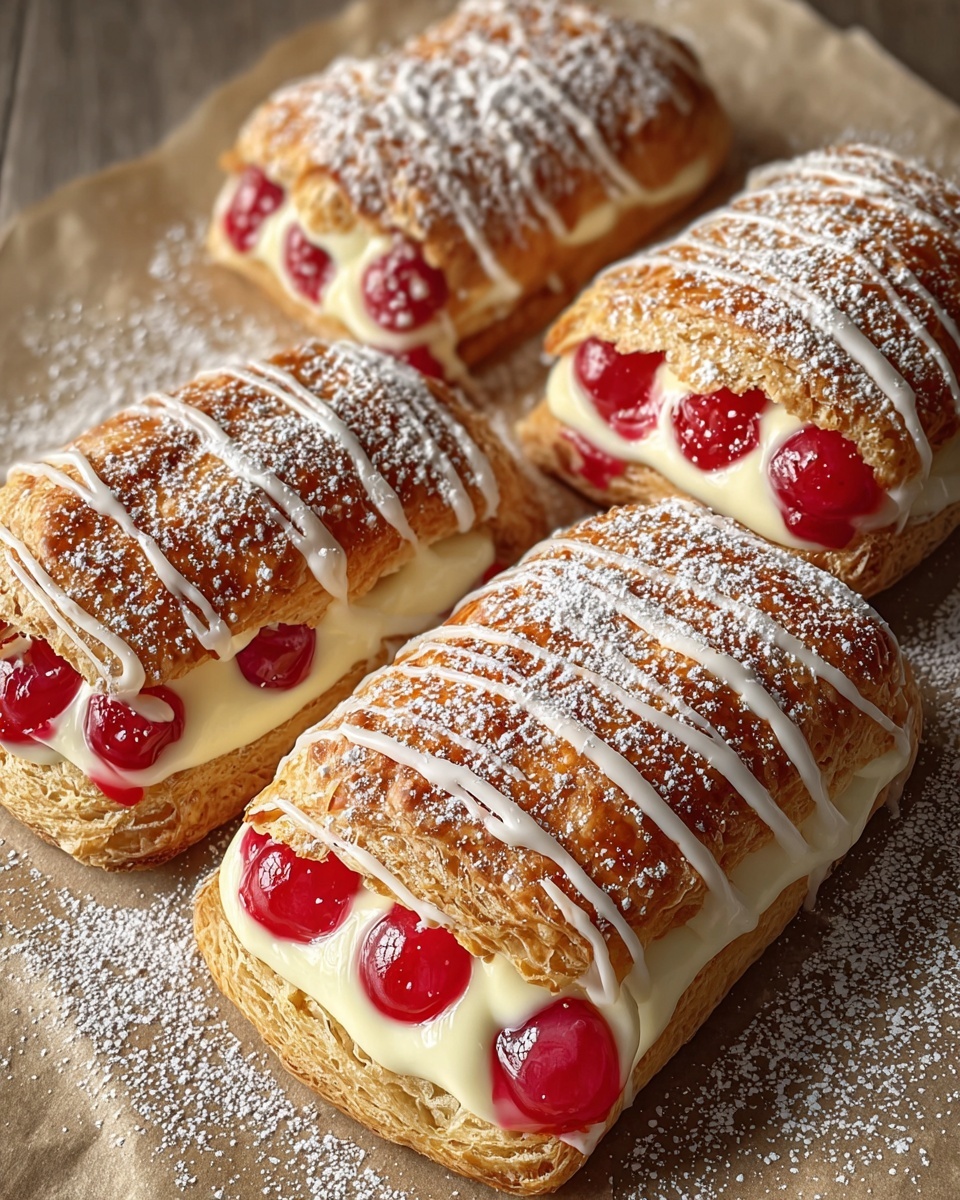
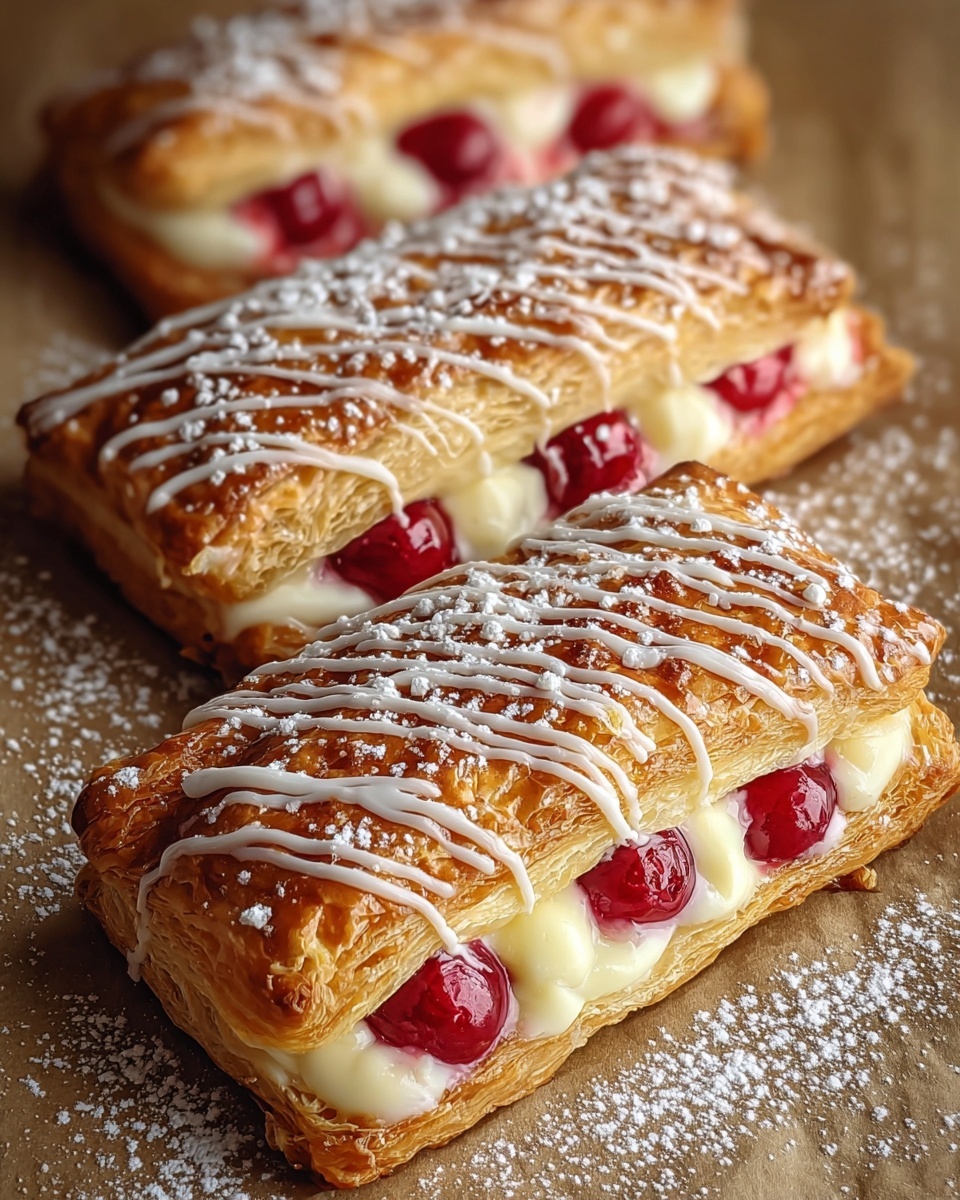
If you’ve ever wanted to impress your friends or family with a delightful homemade treat without spending hours in the kitchen, then this Easy Cherry Danish Pastry Recipe is about to become your new best friend. Flaky puff pastry envelopes a luscious cream cheese filling topped with juicy cherry pie filling, creating a harmonious blend of texture and flavor that tastes like it came from a fancy bakery. The best part? This recipe is straightforward enough for any home baker to master and enjoy time and time again.
Ingredients You’ll Need
Gathering simple yet essential ingredients is the key to making this Easy Cherry Danish Pastry Recipe come to life. Each component plays a vital role in creating that perfect balance of flaky crust, creamy center, and sweet topping.
- 17.3 oz thawed puff pastry: Provides the crisp, flaky base that makes each pastry irresistibly light.
- 21 oz canned cherry pie filling: Adds a vibrant burst of sweet and tangy cherry flavor with a glossy finish.
- 8 oz cream cheese, softened: Creates a smooth, rich filling that perfectly complements the cherries.
- 1/4 cup granulated sugar: Sweetens the cream cheese for balanced flavor without overpowering.
- 1 tsp vanilla extract: Enhances the cream cheese mixture with comforting warmth and depth.
- 1 large egg: Used both in the filling mix and for brushing to achieve a golden crust.
- 2 tsp water: Mixed with egg to make the perfect egg wash for that beautiful shine.
- 1/2 cup powdered sugar: Adds a light dusting of sweetness and a pretty finish.
- 2 tsp whole milk: Together with powdered sugar, it’s used to make a delicate glaze optional to drizzle.
How to Make Easy Cherry Danish Pastry Recipe
Step 1: Prepare the Puff Pastry
Start by making sure your puff pastry is fully thawed at room temperature. This step is crucial for easy handling and helps the layers puff up beautifully during baking. No one wants to wrestle with frozen dough!
Step 2: Make the Cream Cheese Filling
In a mixing bowl, blend softened cream cheese, granulated sugar, and vanilla extract with a hand or stand mixer until perfectly smooth and creamy. This luscious filling will add a velvety texture that contrasts wonderfully with the flaky pastry and tart cherries.
Step 3: Prep Your Baking Sheets
Line two baking sheets with parchment paper; this prevents sticking and makes cleanup a breeze, so you can focus on enjoying your Danish instead of scrubbing pans later.
Step 4: Roll and Cut the Pastry
Lightly flour your workspace, unfold one sheet of puff pastry, and roll it out just a bit to a 9×11 inch rectangle. Using the pastry’s fold lines as a guide, slice each sheet into six triangles for a total of twelve. Scoring a border around each triangle and poking fork holes in the center are simple tricks to give the pastries their signature puffed edges.
Step 5: Assemble the Pastries
Transfer triangles to the baking sheets and layer about two tablespoons of the cream cheese mixture in the center of each. Then top generously with cherry pie filling. This layering ensures every bite bursts with flavor and creaminess.
Step 6: Chill Before Baking
Pop the trays into the refrigerator to chill for at least 15 minutes. This step is a little secret to getting pastries that rise evenly and puff up like they do in bakeries, giving you that impressive presentation at home.
Step 7: Preheat and Brush
Preheat your oven to 400℉ so it’s ready when your pastries come out of the fridge. Prepare an egg wash by whisking together one egg and two teaspoons of water, then gently brush it on the borders of each pastry. This adds a gleaming golden finish.
Step 8: Bake and Cool
Bake pastries until golden and puffed, about 22 minutes. Then let them cool for 5 to 10 minutes on the baking sheets so they set just right before adding final touches.
Step 9: Add the Finishing Touches
Dust each Danish generously with powdered sugar and, if you like, drizzle a simple icing made from powdered sugar and milk. This extra step elevates the flavor and presentation, making your Easy Cherry Danish Pastry Recipe even more irresistible.
How to Serve Easy Cherry Danish Pastry Recipe
Garnishes
Adding a fresh sprig of mint or a few whole cherries atop your Danishes can brighten up the plate and add a pop of color, making your pastries look as good as they taste. A light glaze drizzle also adds a lovely sheen and subtle sweetness.
Side Dishes
This pastry pairs wonderfully with a steaming cup of coffee or a refreshing glass of iced tea, perfect for breakfast, brunch, or an afternoon treat. For a complete spread, consider serving alongside fresh fruit or a simple yogurt parfait to balance richness.
Creative Ways to Present
Turn these Danishes into a charming dessert platter by arranging them on a wooden board layered with parchment paper, adding small bowls of additional cherry filling or cream cheese mixture for dipping. You can also serve them warm with a scoop of vanilla ice cream for an extra special twist.
Make Ahead and Storage
Storing Leftovers
Store leftover Danishes in an airtight container at room temperature for up to two days. Keep in mind the pastry is best enjoyed fresh but will still taste delightful within this short time frame.
Freezing
If you want to make this Easy Cherry Danish Pastry Recipe ahead of time, freeze the unbaked pastries on baking sheets until solid, then transfer to a freezer-safe bag for up to one month. Bake straight from frozen, adding a few extra minutes to the cooking time.
Reheating
To reheat, warm pastries in a 350℉ oven for about 5 to 7 minutes to restore their crisp texture. Avoid microwaving, as it tends to make the pastry soggy and chewy instead of flaky.
FAQs
Can I use fresh cherries instead of canned cherry pie filling?
Absolutely! Fresh cherries can be a delicious alternative, but you’ll want to make a quick compote by cooking them with a bit of sugar and cornstarch to mimic the texture and sweetness of canned pie filling.
Is puff pastry the only type of dough I can use?
Puff pastry is ideal for its light, flaky layers, but if you’re in a pinch, you can try crescent roll dough. The texture won’t be exactly the same, but it still makes a tasty Danish.
Can I prepare and assemble these pastries the night before baking?
Yes! You can assemble the pastries and refrigerate them overnight. Just be sure to cover them tightly to prevent drying out, and add the egg wash before baking for the best finish.
How can I make this recipe dairy-free?
To make this Easy Cherry Danish Pastry Recipe dairy-free, swap cream cheese for a plant-based alternative and use a dairy-free puff pastry brand. The overall taste will still be delightful.
What’s the best way to get the puff pastry to rise nicely?
Chilling the pastries before baking and scoring the pastry edges are both essential steps to encourage a good rise and well-defined layers. Also, using an egg wash helps to seal the edges and promote browning.
Final Thoughts
There’s something truly special about biting into a warm, flaky Danish filled with creamy cheese and sweet cherries, and this Easy Cherry Danish Pastry Recipe brings that perfect moment right to your kitchen. Whether you’re making them for a special occasion or a weekend treat, these pastries are guaranteed to delight everyone at your table. So go ahead, bake up a batch, and savor each delicious bite!
Print
Easy Cherry Danish Pastry Recipe
- Prep Time: 30 minutes
- Cook Time: 22 minutes
- Total Time: 52 minutes
- Yield: 12 pastries
- Category: Dessert
- Method: Baking
- Cuisine: American
Description
This Easy Cherry Danish Pastry recipe features buttery puff pastry triangles filled with smooth cream cheese and sweet cherry pie filling. Lightly brushed with egg wash for a golden finish and dusted with powdered sugar, these pastries are perfect for breakfast, brunch, or an elegant dessert. The recipe is straightforward and yields 12 delightful pastries with a crisp, flaky texture and rich, fruity flavor.
Ingredients
Puff Pastry and Filling
- 17.3 oz thawed puff pastry (1 pack)
- 21 oz canned cherry pie filling (1 can)
- 8 oz cream cheese, softened
- 1/4 cup granulated sugar
- 1 tsp vanilla extract
Egg Wash
- 1 large egg
- 2 tsp water
Glaze
- 1/2 cup powdered sugar
- 2 tsp whole milk
Instructions
- Thaw Puff Pastry: If the puff pastry is frozen, remove it from the freezer and allow it to thaw at room temperature. This typically takes about 30 minutes to ensure the pastry is pliable for handling and rolling.
- Prepare Cream Cheese Mixture: In a mixing bowl, combine the softened cream cheese, granulated sugar, and vanilla extract. Use a hand mixer or stand mixer to blend until smooth and creamy. Set this mixture aside for filling.
- Prepare Baking Sheets: Line two baking sheets with parchment paper (using 9×13 inch sheets or larger) to prevent sticking during baking.
- Roll Out Puff Pastry: Lightly dust your workspace with flour. Unfold a thawed pastry sheet and roll it out slightly to form an approximate 9×11 inch rectangle. This step is optional if you prefer smaller pastries.
- Cut Pastry Triangles: Cut each pastry sheet into 6 even-sized triangles using the folded lines as a guide, for a total of 12 triangles. Gently score a 1/4-inch border around the edge of each triangle without cutting all the way through. Poke a few holes in the center of each triangle with a fork to allow the center to bake flat and let the borders rise.
- Assemble Pastries: Transfer the pastry triangles to the prepared baking sheets. Evenly divide the cream cheese mixture, placing about 2 tablespoons in the center of each pastry. Top each with about 2 tablespoons of cherry pie filling.
- Chill Pastries: Place the assembled pastries in the refrigerator for at least 15 minutes. This chilling step helps achieve puffier, more beautiful pastries during baking.
- Preheat Oven: Preheat your oven to 400°F (204°C) while the pastries chill.
- Apply Egg Wash: In a small bowl, whisk together 1 egg and 2 teaspoons of water. Using a pastry brush, lightly brush the egg wash onto the outer border of each pastry to ensure a golden, glossy finish after baking.
- Bake Pastries: Bake the pastries in the preheated oven for approximately 20-22 minutes or until they are puffed up and golden brown.
- Cool and Glaze: Remove the pastries from the oven and let them cool on the baking sheet for 5-10 minutes. Dust the tops with powdered sugar. Optionally, whisk powdered sugar with whole milk to make a simple icing glaze and drizzle over the pastries for extra sweetness. Serve warm or chilled as preferred.
Notes
- Do not cut through the pastry border when scoring; this helps the edges rise while the center remains flat for filling.
- Chilling the pastries before baking ensures a flaky, well-risen crust.
- Use cold whole milk for glazing to prevent melting the powdered sugar too quickly.
- Leftover pastries can be stored in an airtight container for up to 2 days and reheated in a warm oven to refresh crispness.
- For a dairy-free variation, substitute cream cheese with a dairy-free spread and use an egg replacer for the wash.


